Desktop Client
WebDAV - Rclone
Securely connect to Scramble Cloud via WebDAV – access, manage, and sync encrypted files using Explorer, Finder, Linux, or advanced tools like Rclone.
WebDAV (Web-based Distributed Authoring and Versioning) is a standardized protocol that enables remote file management over the internet. Scramble Cloud provides full WebDAV support through both the integrated desktop client and third-party tools like Rclone.
Note: WebDAV can only be used with a Premium account. If you have a Freemium account, please use your browser for Scramble or upgrade your account to a monthly or lifetime subscription.
1. WebDAV Configuration in the Scramble Desktop Client
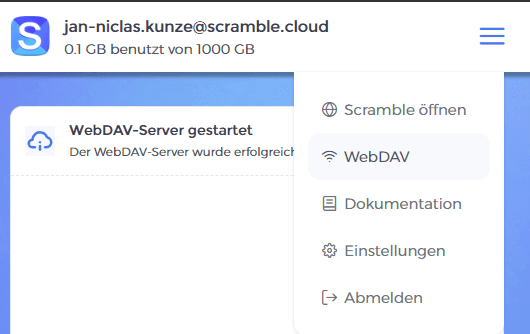
In order to use WebDAV in rclone the following settings need to be set, most importantly, WebDav needs to be enabled. To open the WebDav settings click on the burger menu on the top right corner. In the opened menu click on “WebDav”.
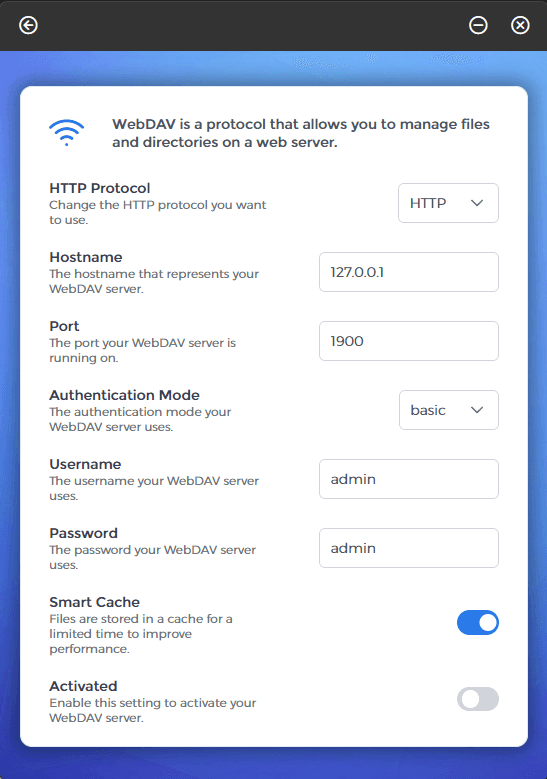
Within the Scramble Desktop Client, the following WebDAV settings are available:
- HTTP Protocol — Select the protocol to use: HTTP or HTTPS.
- Hostname — The address of the WebDAV server (e.g. 127.0.0.1).
- Port — The port on which the WebDAV service is accessible (e.g., 1900).
- Authentication Mode —
basic– Sends username and password in plaintext - Username / Password — Enter the login credentials used for authentication.
- Smart Cache — Enables local caching of files to enhance performance.
- Activated — Enables the WebDAV service for the client.
2. Using Rclone with Scramble (WebDAV)
Rclone is a powerful open-source command-line tool for managing and synchronizing files across cloud storage services. Scramble supports WebDAV, which allows seamless integration with Rclone. This makes it possible to mount your encrypted Scramble storage as a local drive and automate synchronization workflows — ideal for advanced users, scripts, or server-side operations.
📌 Note: This section covers Windows and Linux. Instructions for macOS will follow.
The below steps guide you through the setup of rclone.
2.1. Obscure your Password
Rclone requires an obscured version of your password for secure configuration. Run:
rclone obscure <your-password>This returns a string like:
v7PXevUJpVfufg4nsuQu6movRCyIEnter the string in the next step.
2.2. Create the Rclone Remote
rclone config create scramble_drive webdav \
  url=http://127.0.0.1:1900/ \
  vendor=other \
  user=admin \
pass=<pass-from-above e.g. v7PXevUJpVfufg4nsuQu6movRCyI>- Adjust the url and credentials (user and pass).
2.3. Test the Rclone Remote
Test the newly created configuration like this:
rclone ls scramble_drive:This command should show your stored folder and files in the Scramble root folder.
3. Mounting Scramble WebDAV on Linux
The following steps walk you through the configuration of Rclone to mount your Scramble WebDAV storage.
3.1. Create a Mount Point
mkdir -p /mnt/scrambleReplace user accordingly.
3.2. Mount the Remote Drive
rclone mount scramble_drive: /mnt/scrambleYou can now access your Scramble files at /mnt/scramble/ like any local directory.
To run the mount in background or permanently, consider:
- Adding
&at the end for temporary background use - Creating a systemd service for persistent mounting
3.3. Creating a systemd service
3.3.1: Create Log Directory and File
Create a dedicated folder and log file for Rclone operations:
mkdir -p /home/user/rclone-logs
touch /home/user/rclone-logs/rclone.log
Replace /home/user/ with the actual path to your Linux user account.
3.3.2: Create a Mount Point
If not already set:
sudo mkdir -p /mnt/scramble
sudo chown $USER:$USER /mnt/scramble
This directory will be used as the mount location for your Scramble drive.
3.3.3: Create a systemd User Service
Create the systemd service folder if it doesn’t already exist:
mkdir -p ~/.config/systemd/userCreate the Rclone mount service file:
nano ~/.config/systemd/user/rclone-scramble.servicePaste the following configuration:
[Unit]
Description=Mount Scramble WebDAV via Rclone
After=network-online.target
Wants=network-online.target

[Service]
Type=notify
ExecStart=/usr/bin/rclone mount scramble_drive: /mnt/scramble \
  --vfs-cache-mode full \
  --dir-cache-time 12h \
  --timeout 1m \
  --umask 002 \
  --uid=%U \
  --gid=%G \
  --log-level INFO \
  --log-file /home/%u/.local/share/rclone/rclone.log
ExecStop=/bin/fusermount -u /mnt/scramble
Restart=on-failure
RestartSec=10

[Install]
WantedBy=default.target
🔍 Replace %U and %G with numeric values if necessary (id -u, id -g).
3.3.4: Enable and Start the Service
Run the following commands:
systemctl --user daemon-reload
systemctl --user start rclone-scramble.service
systemctl --user enable rclone-scramble.service
✅ enable ensures the service starts automatically at user login.
3.3.5: Check Status and Logs
To verify the service is running:
systemctl --user status rclone-scramble.serviceTo view logs:
journalctl --user -u rclone-scramble.service -f4. Mounting Scramble WebDAV on Windows
- Install WinFsp
- Download Rclone for Windows and unzip the downloaded archive.
- Open the folder that contains
rclone.exe. - Click into the address bar at the top of File Explorer, type
cmd, and press Enter. This opens a Command Prompt directly in the folder whererclone.exeis located. - Run the mount command:
.\rclone.exe mount --vfs-cache-mode full --buffer-size 64M --network-mode scramble_drive: X:Keep this terminal window open while you use the mounted drive. As soon as you close the window, the mount will stop and drive X: will disappear again.
4.1. Persistent mount
If you want the Scramble drive to be available again after a restart, you can start Scramble Desktop and Rclone automatically when Windows starts. The easiest option is to create a small batch file and place it in the Windows Startup folder.
The Scramble Desktop Client must be running before Rclone can connect to the local WebDAV server. The script below starts Scramble Desktop, waits a short moment, and then mounts the drive.
- Open the folder where
rclone.exeis located. - Right-click inside the folder and create a new text file.
- Rename the file to
mount-scramble.bat. Make sure the file ends with.batand not.txt. - Right-click the file and select Edit.
- Paste the following content:
@echo off
start "" "%LOCALAPPDATA%\Programs\Scramble Desktop\Scramble Desktop.exe"
timeout /t 20 /nobreak >nul
cd /d "%~dp0"
rclone.exe mount --vfs-cache-mode full --buffer-size 64M --network-mode scramble_drive: X:- Save the file.
- Press
Win + R, typeshell:startup, and press Enter. This opens the Startup folder for your Windows user. - Copy
mount-scramble.batinto this Startup folder. - Restart Windows and log in again. Windows will start Scramble Desktop first and mount the Scramble drive automatically as drive
X:after the short delay.
Important notes:
- The mount starts after you log in to Windows, not before the login screen.
- Scramble Desktop is installed by default under
%LOCALAPPDATA%\Programs\Scramble Desktop\. If you installed it in a different location, adjust the path in the batch file accordingly. - If Scramble Desktop needs more time to start on your system, increase
timeout /t 20to a higher value, for exampletimeout /t 40. - Do not move
rclone.exeafter creating the batch file. If you move it, update the batch file or create it again in the new folder. - If drive
X:is already used by another drive, changeX:in the command to another free drive letter, for exampleS:. - A small terminal window may stay open while the mount is active. Closing it will stop the mount.
5. Mounting Scramble WebDAV on macOS
Instructions for integrating Scramble WebDAV with Rclone on Windows (e.g., via WinFsp) and macOS (via macFUSE) will be added shortly.